

Programmable Fused Spur Timer Switch: Hints & Tips
Here, we answer some FAQs and share some useful hints and tips to help guide you through the initial set-up and operation of the timer switch.
If you experience any issues which are not listed below, please let us know so we can try and help resolve them for you.
What back boxes are compatible with this fused spur timer switch?
We offer both a surface mounted back box and a dry lining back box with spacer depending on your requirements. Both are fully compatible with our fused spur timer switches.
Will the device work without a neutral?
No, please note that the device needs a live and neutral from the power supply and a live and neutral to the load to function properly.
I have set the timer to come ON now but it is not responding. Why?
When setting the programme schedule, please note that the timer will not come ON if the start time has already passed.
For example: It is 0900. You set the programme schedule to come ON at 0700 and OFF at 1000. The timer will not come ON now because the timer has missed its programmed ON time.
In this example, you can press the ADV button once. The power will come ON and the display will show ‘ON ADVANCE’. The power will remain on until the programmed OFF time. In the example above, this would be 1000.
What does the ADV (Advance) button do?
When not in operation, the default position for the timer is to display ‘OFF’. This means that there is NO power to the load and the timer will operate as per the programme schedule.
Pressing the ADV button has 4 functions, as follows:
Option 1: Press ADV once. This changes the display to ON ADVANCE. This turns the power ON to the load. The power will remain on until the next programmed OFF time.
Option 2: Press ADV again. This changes the display to ON OVERRIDE. This is an OVERRIDE feature (and ignores the programme schedule). This turns the power ON to the load. The power will remain ON until you turn it off.
Option 3: Press ADV again. This changes the display to OFF OVERRIDE. This is an OVERRIDE feature (and ignores the programme schedule). This turns the power OFF to the load. The power will remain OFF until you turn it back on.
Option 4: Press ADV again. This changes the display to OFF. This is the normal operating state. The timer will operate as per its programme schedule.
Why is there is an ERR (error) message when setting the programme schedule?
The programme schedule works from midnight to midnight. If you want to set a programme to run across midnight, you need to set one programme to end at 2359 and the next programme to start at 0000.
There has been a power failure – do I need to reset the programme schedule?
No, the timer has an integrated back-up battery. A fully charged battery can retain all settings for a period of 30 days without power.
Does the timer work on an Economy 7 system?
The timer is compatible with an Economy 7 system. Ensure that the integrated back-up battery is fully charged (this takes approximately 24 hours). Note that the display screen may appear blank after an extended period of time without power; this is to conserve the battery life. If this happens, simply press any button to 'wake' the timer.
Why does the timer not turn on and off at the scheduled times?
In the programme schedule, ensure the correct days of the week have been selected. Multiple days or single days can be set for each programmed ON and OFF time.
Please watch our video on setting the programme schedule for more information.
Please also check that you have not accidentally enabled OVERRIDE ON as this will override all programme settings and keep sending power to the load until you select OFF. To switch override off, press the ADV button until the display shows OFF.
How do I set the programme schedule to run on specific days of the week?
If you have already set some programmes, it may be best to clear the programme schedule and start from scratch.
To clear the memory, insert a pointed instrument into the reset button for at least 5 seconds and then remove.
You will then need to reset the time and date.
For a demo of this, please watch our video.
To set programmes for individual days, please follow these steps (Part 5 of our video):
1. When the time is displayed on screen, press and hold the PROG button for about 3 seconds until the display changes. Stop pressing the PROG button
2. The display shows all the days of the week
3. Keep pressing the ADV button until only the day you want to programme is shown (for example): TUES
4. Then press PROG
5. This allows you to set the ON time for programme 1. The display says ON PROG 1 in the right-hand corner
6. Press the ADV (to go forward) and BOOST (to go backwards) buttons to set the hour then press PROG to set the minutes
7. Press the ADV and BOOST buttons to set the minutes then press PROG to set the OFF time for programme 1.
8. The display shows OFF PROG 1 in the right-hand corner
9. Press the ADV and BOOST buttons to set the hour then press PROG to set the minutes
10. Press the ADV and BOOST buttons to set the minutes
11. Then press PROG
12. Repeat the above steps to set programme 2, programme 3, and programme 4 if required. You can set up to 4 programmes for each day of the week.
13. When you have finished setting the programmes for Tuesday, press and hold PROG for approx. 3 seconds. The screen will exit the programme schedule and return to display the time.
14. To set programmes to run on other days, repeat the steps as described above by first selecting the day of the week.
15. You can set 4 different programmes each day for every day of the week. This allows up to 28 different programmes in total.
Does the timer clock automatically adjust for daylight saving (DST)?
The timer is configured to US DST (note that this cannot currently be changed). If you are located in the US and would like to enable DST, please take the following steps:
At initial set up:
1. Power up the device
2. The screen will display COdE and the word ON or OFF
If COdE is not displayed, insert a thin pointed instrument into the RESET button for approximately 5 seconds and then remove.
4. Press the ADV button to toggle between ON and OFF. This sets daylight saving to be ON or OFF. If you are using the device in a country which recognises US DST, set this to ON.
5. Set the date and time as usual
If you have already set up the timer and daylight saving is not activated, please note that you will need to reset the device and follow the steps outlined above.
Please note that the timer is sold to customers all around the world. By default, the timer's daylight saving time has been configured to US time. If you have enabled DST and are using the timer in another country where the DST dates are different, there will be a period of time when the timer's clock will not be synchronised to local time. This will auto-correct when local DST aligns to US DST.
Why is the timer not responding to any functions?
Check that the 13 amp fuse is working. Use a flat edge screwdriver or similar implement to remove the fuse cover and replace the fuse if required.
Check that the 2-pole isolation switch on the front of the unit is switched to the ON position.
The screen is displaying 'OVERRIDE'
The ‘override’ display is a safety feature and is activated to protect the internal circuit board from damage.
Usually, this feature is activated in the event of the device being overloaded or a power surge.
To reset the device, remove the power from the unit for at least 12 hours. When you reinstate the power, insert a pointed instrument into the reset button for at least 5 seconds to restore factory settings. You will then need to re-set the time, date, and programme schedule.
The timer is not working as expected and/or the display is flashing.
Please check the following:
1. The maximum operating temperature of the timer is set at 40° Celsius. If the ambient temperature exceeds this level, the integrated safety device may have been automatically activated to prevent the timer from overheating. If this happens, some functionality may be temporarily disabled. (To avoid exposure to excessive temperatures, locate the timer switch away from direct sunlight. If the timer is stored in a cupboard, ensure there is adequate ventilation.)
2. The maximum load is 3kW (3000 watts). If this level is exceeded (even temporarily), the integrated safety device may have been automatically activated to protect the timer's circuit board. If this happens, some functionality may be temporarily disabled.
To reset the device, remove the power for a period of 12-24hrs to allow sufficient time for the timer to return to its usual operation.
Can the brightness of the LEDs be adjusted?
No, the brightness of the LEDs cannot currently be changed. However, this is something we are looking at introducing in the future.
The wiring diagram for the timer:
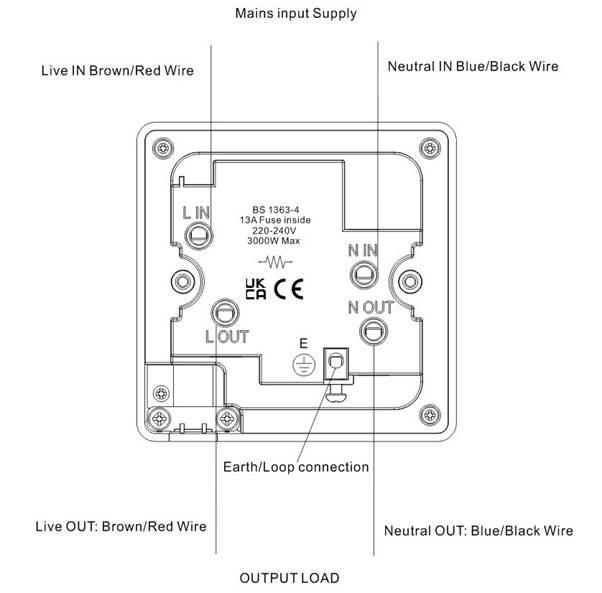
You can find further information on our website, including other blog articles at:
For any additional help and assistance, please do not hesitate to contact us.